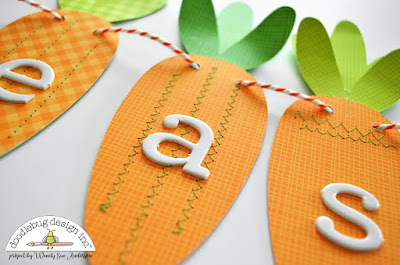
Hi there! I am so excited to share a banner I created with some of the "Easter Express" silhouette cut files from Doodlebug Design! I started with the carrot file and created this fun banner:
It was really fun and easy - I just sized the two carrot shapes so I could fit four across a 12x12 paper. Speaking of paper, I used petite prints for both the carrots and leaves - I love the subtle pattern on these!
After I cut the shapes, I layered them together.
And added machine stitching (with green thread) to each one.
Each one is stitched differently, just for interest.
After adding the stitching, I punched two holes in the top of each carrot.
And then I strung doodle twine through each one to create the garland.
Finally, I added white "chippers!" to each carrot to spell out "Hoppy Easter." Oh, except for one carrot - there you'll find the cute bunny doodle-pop to separate the words!
And now it's hanging above my fireplace, wishing everyone who enters our home a "Hoppy Easter!"
Now, suppose instead of hanging this cute banner, I wanted to give it away as a gift. Here's how I'd do it:
Yep, I'd use that cute Mr. Bunny cut file to embellish a gift bag!
I wanted to personalize the bag, so I cut out another carrot, with the name spelled out on the top layer!
Don't forget to decorate the back!
Products I used:
Doodlebug Design - Petite Prints Collection - 12 x 12 Paper Pack - Gingham and Linen - Rainbow
Scrapbook.com
Scrapbook.com
Doodlebug Design - Petite Prints Collection - 12 x 12 Double Sided Paper - Gingham and Linen - Tangerine
Scrapbook.com
Scrapbook.com
Doodlebug Design - Petite Prints Collection - 12 x 12 Double Sided Paper - Gingham and Linen - Grasshopper
Scrapbook.com
Scrapbook.com
Doodlebug Design - Petite Prints Collection - 12 x 12 Double Sided Paper - Gingham and Linen - Limeade
Scrapbook.com
Scrapbook.com
Doodlebug Design - Petite Prints Collection - 12 x 12 Double Sided Paper - Gingham and Linen - Mandarin
Scrapbook.com

Scrapbook.com


No comments:
Post a Comment